Installation
Crowdsourcr is a Python program that uses MongoDB and the Tornado library. Optionally, it may use nginx for load balancing across multiple processes and for serving static content.
For both Linux and Windows you need at least Python 3.7 and pip. If you have several Python versions installed you might have to select the correct one by using the command python3 or python3.8 instead of python.
You can easily check your Python version by typing python --version.
Install the following Python libraries (assuming that your Python 3 installation is invoked with python command):
pip install tornado
pip install pymongo
pip install boto3
pip install validators
pip install future-fstrings
pip install jsonpickle
pip install xmltodict
pip install ImageHash
pip install pycountry
pip install spacy
python -m spacy download en_core_web_sm
On Linux you can also simply run the requirements.txt file:
sudo pip install -r requirements.txt
If you want to modify the documentation you also need to install the boostrap theme for sphinx:
pip install pydata-sphinx-theme
Modify the rst files under doc_sphinx/usage and then compile the new documentation by running the create_documentation file in root directory.
Linux
For this section, we will assume an Ubuntu installation.
Make sure MongoDB is installed and running. If it is not, follow the instructions at http://docs.mongodb.org/manual/tutorial/install-mongodb-on-ubuntu/.
To set up Crowdsourcr itself, copy config/config_example.json
to config/MY_CONFIG_FILENAME.json (choose config.json if you do not want to specify the config filename during startup) and modify the settings. Crowdsourcr
uses Google OAuth2 for authentication, so you need to get Google
OAuth2 keys from their developer console using your Google account. The configuration file
(or Google configuration below) has more details about this. Put
your Google account into the list of superadmins in your config file so that you can
administrate the administrators for Crowdsourcr.
You also need to obtain an access key and secret from the AWS console in order to use the Amazon Turk integration. Modify the appropriate settings in your config JSON.
At this point, it should be possible to start Crowdsourcr by entering the src directory and running
python app.py
and then going to http://YOUR.DOMAIN:YOUR_PORT/admin. If you cannot access the website you need to open port 80 on the Ubuntu firewall.
Note, that Crowdsourcr will by default only run in the MTurk sandbox mode. If you want to post jobs to MTurk use instead:
python app.py --environment=production
On Linux, we support starting Crowdsourcr as a daemon. For this to
work, copy config/daemons_config.py.example to
config/daemons_config.py and add an entry to the daemons list
describing on which port(s) you want Crowdsourcr to run (or just use
the default configuration already provided). Make sure that the
Python package python-daemon, as described in
requirements.txt, is installed, as this is a requirement for
daemonization. Crowdsourcr can be started with ./daemons start
CONFIGNAME or stopped with ./daemons stop CONFIGNAME. You can
get help for these commands with ./daemons help.
While this is already sufficient for using Crowdsourcr, we recommend
using nginx for serving static content and load balancing across
multiple Python processes. We already have a daemon configuration
called a which assumes nginx is set up as a load-balancing proxy.
To be able to use it, first sudo apt-get install nginx. Then
create a new file called /etc/nginx/sites-available/Crowdsourcr-a
with the following content:
upstream Crowdsourcr_a {
         server 127.0.0.1:8101;
         server 127.0.0.1:8102;
}

server {
       charset uft-8;

       include mime.types;
       listen 80;
       server_name www.crowdsourcr.org; # REPLACE THIS APPROPRIATELY

       client_max_body_size 30m;

       location ^~  {
                expires max;
                add_header Cache-Control public;
                root /home/kmill/Crowdsourcr; # REPLACE THIS APPROPRIATELY
       }

       location ~ /.* {
                proxy_pass_header Server;
                proxy_set_header Host $http_host;
                proxy_connect_timeout 3600;
                proxy_send_timeout 3600;
                proxy_read_timeout 3600;
                send_timeout 3600;
                proxy_buffering off;
                proxy_redirect off;
                proxy_set_header X-Real-IP $remote_addr;
                proxy_set_header X-Scheme $scheme;
                proxy_pass http://Crowdsourcr_a;
       }
}
Next, run the following command to enable this configuration for nginx:
sudo ln -s /etc/nginx/sites-available/Crowdsourcr-a /etc/nginx/sites-enabled/Crowdsourcr-a
and reload nginx:
sudo service nginx reload
From the Crowdsourcr directory, you can start up the a
configuration with
./daemons start a
This completes the Linux installation.
Windows
Install MongoDB. To set up the database, go into Mongo’s bin
directory with the command promt and run
md \data\db
After this, you need to start mongod, which is also in the bin
directory.
To set up Crowdsourcr itself, copy config/config_example.json
to config/MY_CONFIG_FILENAME.json (choose config.json if you do not want to specify the config filename during startup) and modify the settings. Crowdsourcr
uses Google OAuth2 for authentication, so you need to get Google
OAuth2 keys from their developer console. The configuration file
(or Google configuration below) has more details about this. Put
your Google account into the list of superadmins so that you can
administrate the administrators for Crowdsourcr.
Specify the port and the database name under which Crowdsourcr should run. You can run several surveys in parallel on the same machine by specifying distinct port/database names.
You also need to obtain an access key and secret from the AWS console in order to use the Amazon Turk integration. Modify the appropriate settings in your JSON file.
At this point, it should be possible to start Crowdsourcr by entering the src directory and running
python app.py
and then going to http://YOUR.DOMAIN:YOUR_PORT/admin.
Note, that Crowdsourcr will by default only run in the MTurk sandbox mode. If you want to post jobs to MTurk use instead:
python app.py --environment=production
For optimal speed, you can use nginx as a proxy for load balancing and for serving static content.
Download a zip package of nginx for Windows and unzip it into a
directory such as C:/nginx (we will assume this is where you
placed it for the rest of the guide). Then, open
C:/nginx/conf/nginx.conf and replace the server directive with the
following (modifying the marked things appropriately):
upstream Crowdsourcr_a {
         server 127.0.0.1:8101;
         server 127.0.0.1:8102;
}

server {
       charset uft-8;

       include mime.types;
       listen 80;
       server_name www.crowdsourcr.org; # REPLACE THIS APPROPRIATELY

       client_max_body_size 30m;

       location ^~  {
                expires max;
                add_header Cache-Control public;
                root C:/news_Crowdsourcr; # REPLACE THIS APPROPRIATELY
       }

       location ~ /.* {
                proxy_pass_header Server;
                proxy_set_header Host $http_host;
                proxy_connect_timeout 3600;
                proxy_send_timeout 3600;
                proxy_read_timeout 3600;
                send_timeout 3600;
                proxy_buffering off;
                proxy_redirect off;
                proxy_set_header X-Real-IP $remote_addr;
                proxy_set_header X-Scheme $scheme;
                proxy_pass http://Crowdsourcr_a;
       }
}
To start nginx, run start nginx from the nginx directory (and see
http://nginx.org/en/docs/windows.html for more information about
reloading or stopping nginx)
Then, with nginx set up like this, running start_a.bat from the
Crowdsourcr package will start up two processes in two windows.
This completes the Windows installation.
Google configuration
This was briefly described in each of these sections, but it may be useful if the details are elaborated upon here. Crowdsourcr uses OAuth2 for authentication. This means that you need to have a Google account to administer your Crowdsourcr installation and that you need an OAuth client ID from Google.
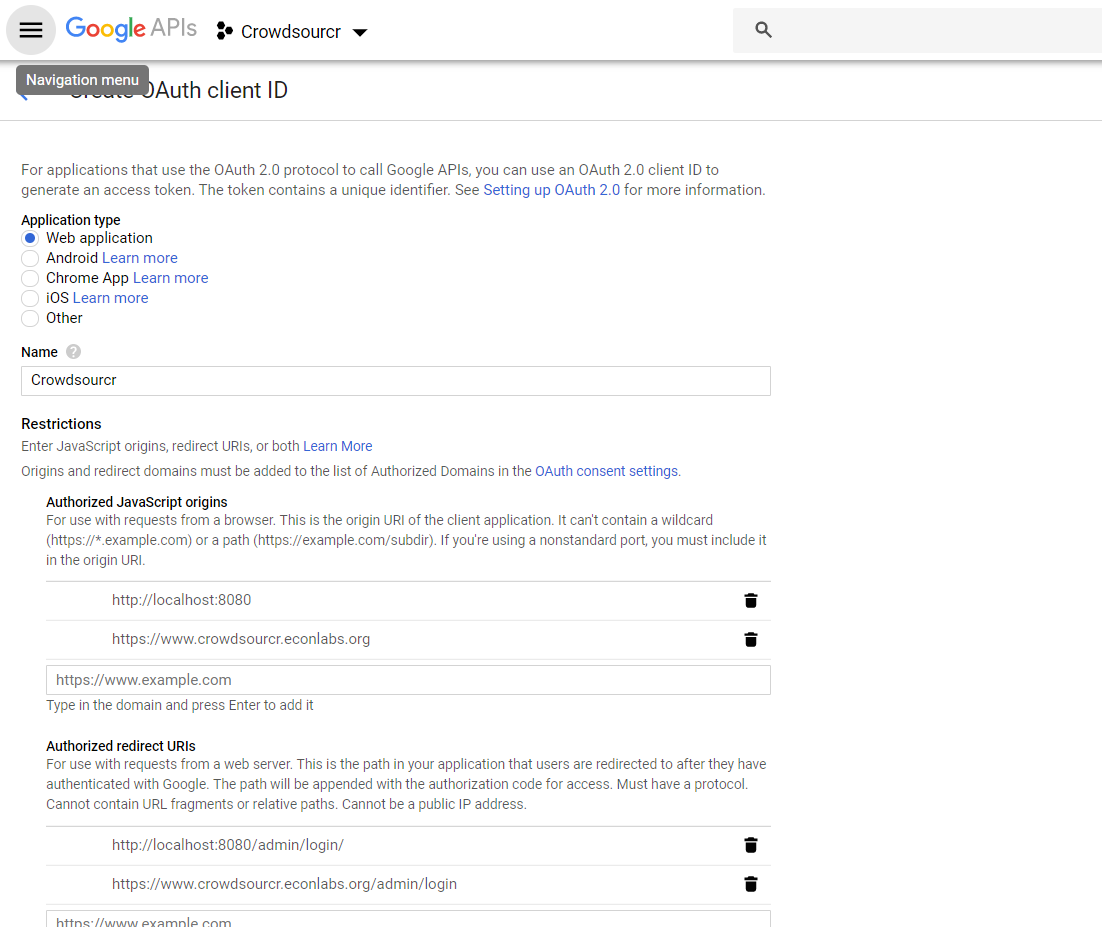
First go to https://console.developers.google.com and create a new project. It
does not matter what it is called. Once this is created, go to
“Credentials.” There should be a button which says
“Create Credentials”. Click it, then select “OAuth Client ID”. You will
be prompted to first set up your OAuth consent screen. Enter the minimal
amount of information that will let you pass to the next screen. On
the next screen select “Web application”, choose a name and click
“Create”. Enter information similar to that in the following image,
replacing the domain appropriately. If you want to do local testing add http://localhost:8080 as Authorized Domain (if you are running on port 8080) and http://localhost:8080/admin/login/
as Authorized Redirect URI. Note carefully the trailing slash in the “Authorized Redirect URI” and the http rather than https. Authentication will not work if either of these
are missing.
After creating the client ID, copy the “Client ID” and “Client secret” under “Client ID for web application” (and not the “Compute Engine and App Engine”) into your config JSON. This should complete the configuration for Google OAuth2 authentication.